The Scientist and Engineer's Guide to
Digital Signal Processing
By Steven W. Smith, Ph.D.
Book Search

Table of contents
- 1: The Breadth and Depth of DSP
- 2: Statistics, Probability and Noise
- 3: ADC and DAC
- 4: DSP Software
- 5: Linear Systems
- 6: Convolution
- 7: Properties of Convolution
- 8: The Discrete Fourier Transform
- 9: Applications of the DFT
- 10: Fourier Transform Properties
- 11: Fourier Transform Pairs
- 12: The Fast Fourier Transform
- 13: Continuous Signal Processing
- 14: Introduction to Digital Filters
- 15: Moving Average Filters
- 16: Windowed-Sinc Filters
- 17: Custom Filters
- 18: FFT Convolution
- 19: Recursive Filters
- 20: Chebyshev Filters
- 21: Filter Comparison
- 22: Audio Processing
- 23: Image Formation & Display
- 24: Linear Image Processing
- 25: Special Imaging Techniques
- 26: Neural Networks (and more!)
- 27: Data Compression
- 28: Digital Signal Processors
- 29: Getting Started with DSPs
- 30: Complex Numbers
- 31: The Complex Fourier Transform
- 32: The Laplace Transform
- 33: The z-Transform
- 34: Explaining Benford's Law
How to order your own hardcover copy
Wouldn't you rather have a bound book instead of 640 loose pages?Your laser printer will thank you!
Order from Amazon.com.
Chapter 24: Linear Image Processing
Even though the Fourier transform is slow, it is still the fastest way to convolve an image with a large filter kernel. For example, convolving a 512×512 image with a 50×50 PSF is about 20 times faster using the FFT compared with conventional convolution. Chapter 18 discusses how FFT convolution works for one-dimensional signals. The two-dimensional version is a simple extension.
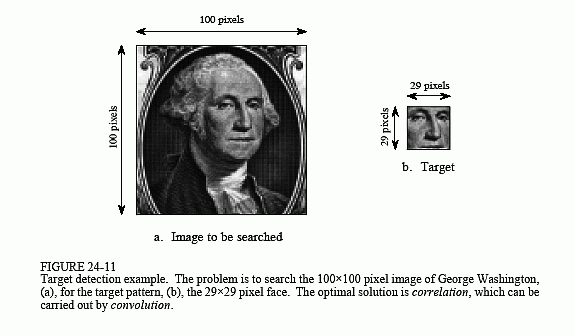
We will demonstrate FFT convolution with an example, an algorithm to locate a predetermined pattern in an image. Suppose we build a system for inspecting one-dollar bills, such as might be used for printing quality control, counterfeiting detection, or payment verification in a vending machine. As shown in Fig. 24-11, a 100×100 pixel image is acquired of the bill, centered on the portrait of George Washington. The goal is to search this image for a known pattern, in this example, the 29×29 pixel image of the face. The problem is this: given an acquired image and a known pattern, what is the most effective way to locate where (or if) the pattern appears in the image? If you paid attention in Chapter 6, you know that the solution to this problem is correlation (a matched filter) and that it can be implemented by using convolution.
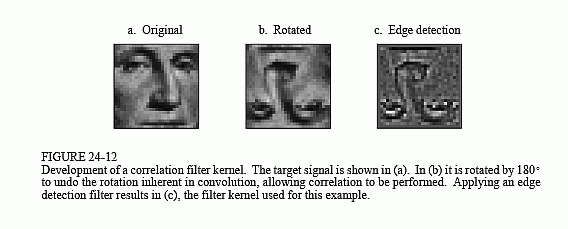
Before performing the actual convolution, there are two modifications that need to be made to turn the target image into a PSF. These are illustrated in Fig. 24-12. Figure (a) shows the target signal, the pattern we are trying to detect. In (b), the image has been rotated by 180°, the same as being flipped left-for-right and then flipped top-for-bottom. As discussed in Chapter 7, when performing correlation by using convolution, the target signal needs to be reversed to counteract the reversal that occurs during convolution. We will return to this issue shortly.
The second modification is a trick for improving the effectiveness of the algorithm. Rather than trying to detect the face in the original image, it is more effective to detect the edges of the face in the edges of the original image. This is because the edges are sharper than the original features, making the correlation have a sharper peak. This step isn't required, but it makes the results significantly better. In the simplest form, a 3×3 edge detection filter is applied to both the original image and the target signal
before the correlation is performed. From the associative property of convolution, this is the same as applying the edge detection filter to the target signal twice, and leaving the original image alone. In actual practice, applying the edge detection 3×3 kernel only once is generally sufficient. This is how (b) is changed into (c) in Fig. 24-12. This makes (c) the PSF to be used in the convolution
Figure 24-13 illustrates the details of FFT convolution. In this example, we will convolve image (a) with image (b) to produce image (c). The fact that these images have been chosen and preprocessed to implement correlation is irrelevant; this is a flow diagram of convolution. The first step is to pad both signals being convolved with enough zeros to make them a power of two in size, and big enough to hold the final image. That is, when images of 100×100 and 29×29 pixels are convolved, the resulting image will be 128×128 pixels. Therefore, enough zeros must be added to (a) and (b) to make them each 128×128 pixels in size. If this isn't done, circular
convolution takes place and the final image will be distorted. If you are having trouble understanding these concepts, go back and review Chapter 18, where the one-dimensional case is discussed in more detail.
The FFT algorithm is used to transform (a) and (b) into the frequency domain. This results in four 128×128 arrays, the real and imaginary parts of the two images being convolved. Multiplying the real and imaginary parts of (a) with the real and imaginary parts of (b), generates the real and imaginary parts of (c). (If you need to be reminded how this is done, see Eq. 9-1). Taking the Inverse FFT completes the algorithm by producing the final convolved image.
The value of each pixel in a correlation image is a measure of how well the target image matches the searched image at that point. In this particular example, the correlation image in (c) is composed of noise plus a single bright peak, indicating a good match to the target signal. Simply locating the brightest pixel in this image would specify the detected coordinates of the face. If we had not used the edge detection modification on the target signal, the peak would still be present, but much less distinct.
While correlation is a powerful tool in image processing, it suffers from a significant limitation: the target image must be exactly the same size and rotational orientation as the corresponding area in the searched image. Noise and other variations in the amplitude of each pixel are relatively unimportant, but an exact spatial match is critical. For example, this makes the method almost useless for finding enemy tanks in military reconnaissance photos, tumors in medical images, and handguns in airport baggage scans. One approach is to correlate the image multiple times with a variety of shapes and rotations of the target image. This works in principle, but the execution time will make you loose interest in a hurry.